


Chapter 10: Teaching with VEXcode VR
Lesson 5: Facilitating an Open-Ended Challenge
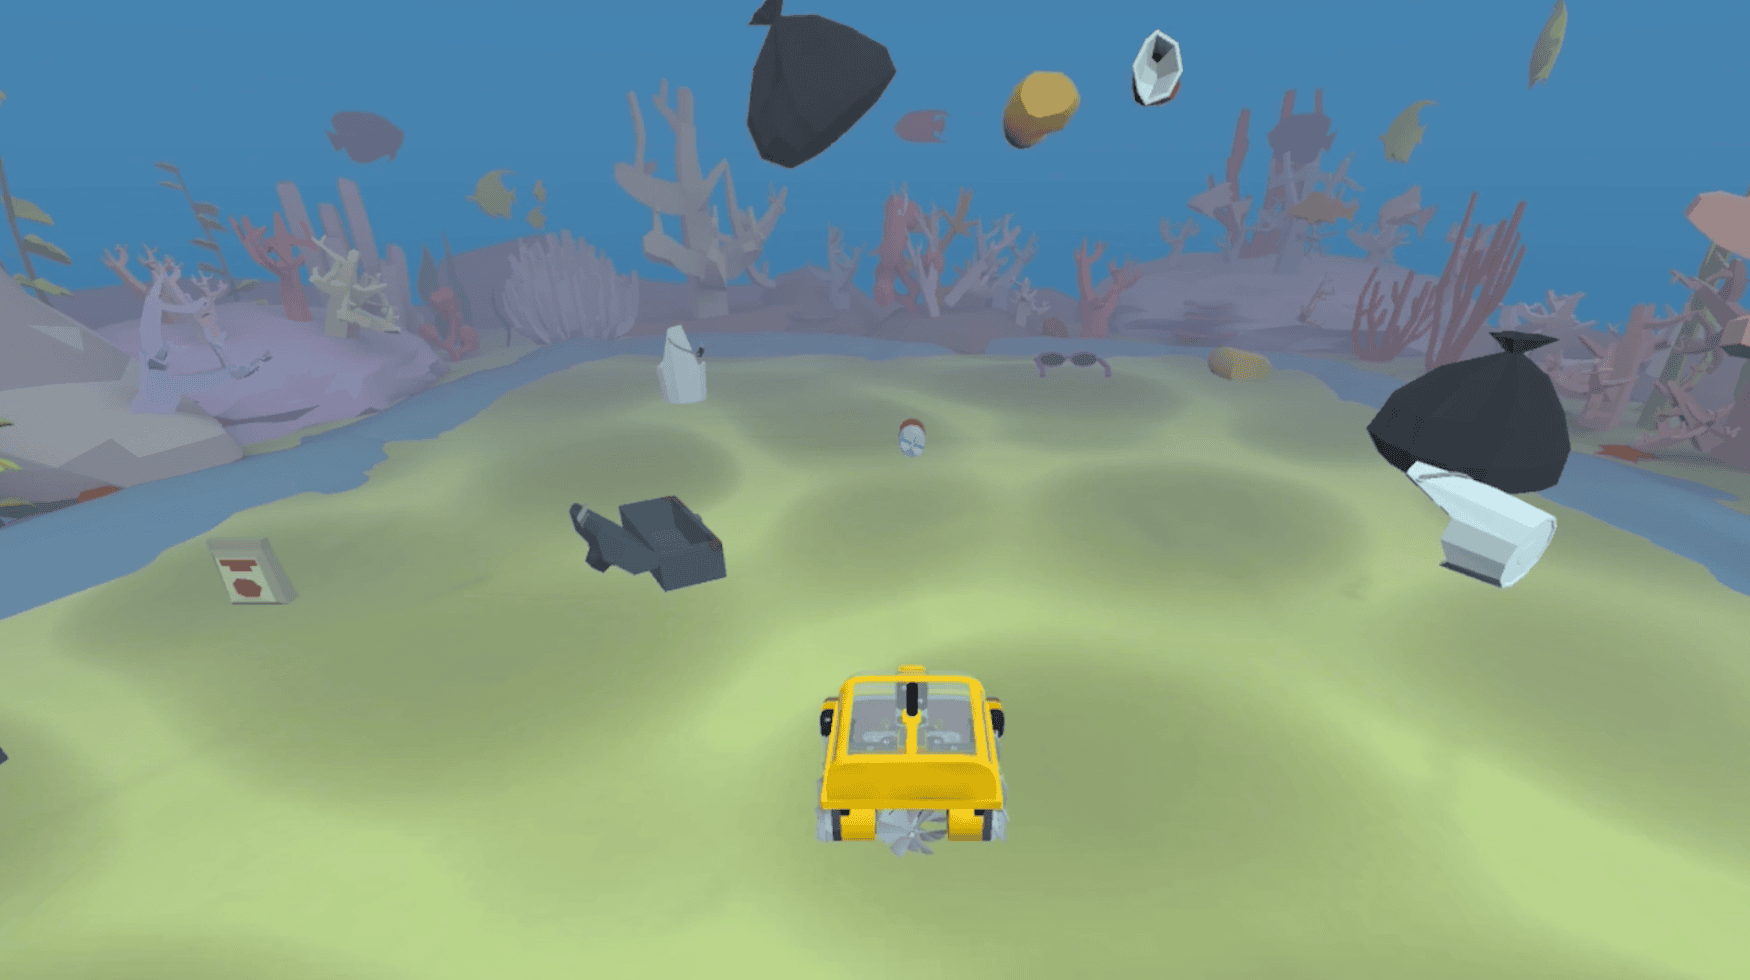
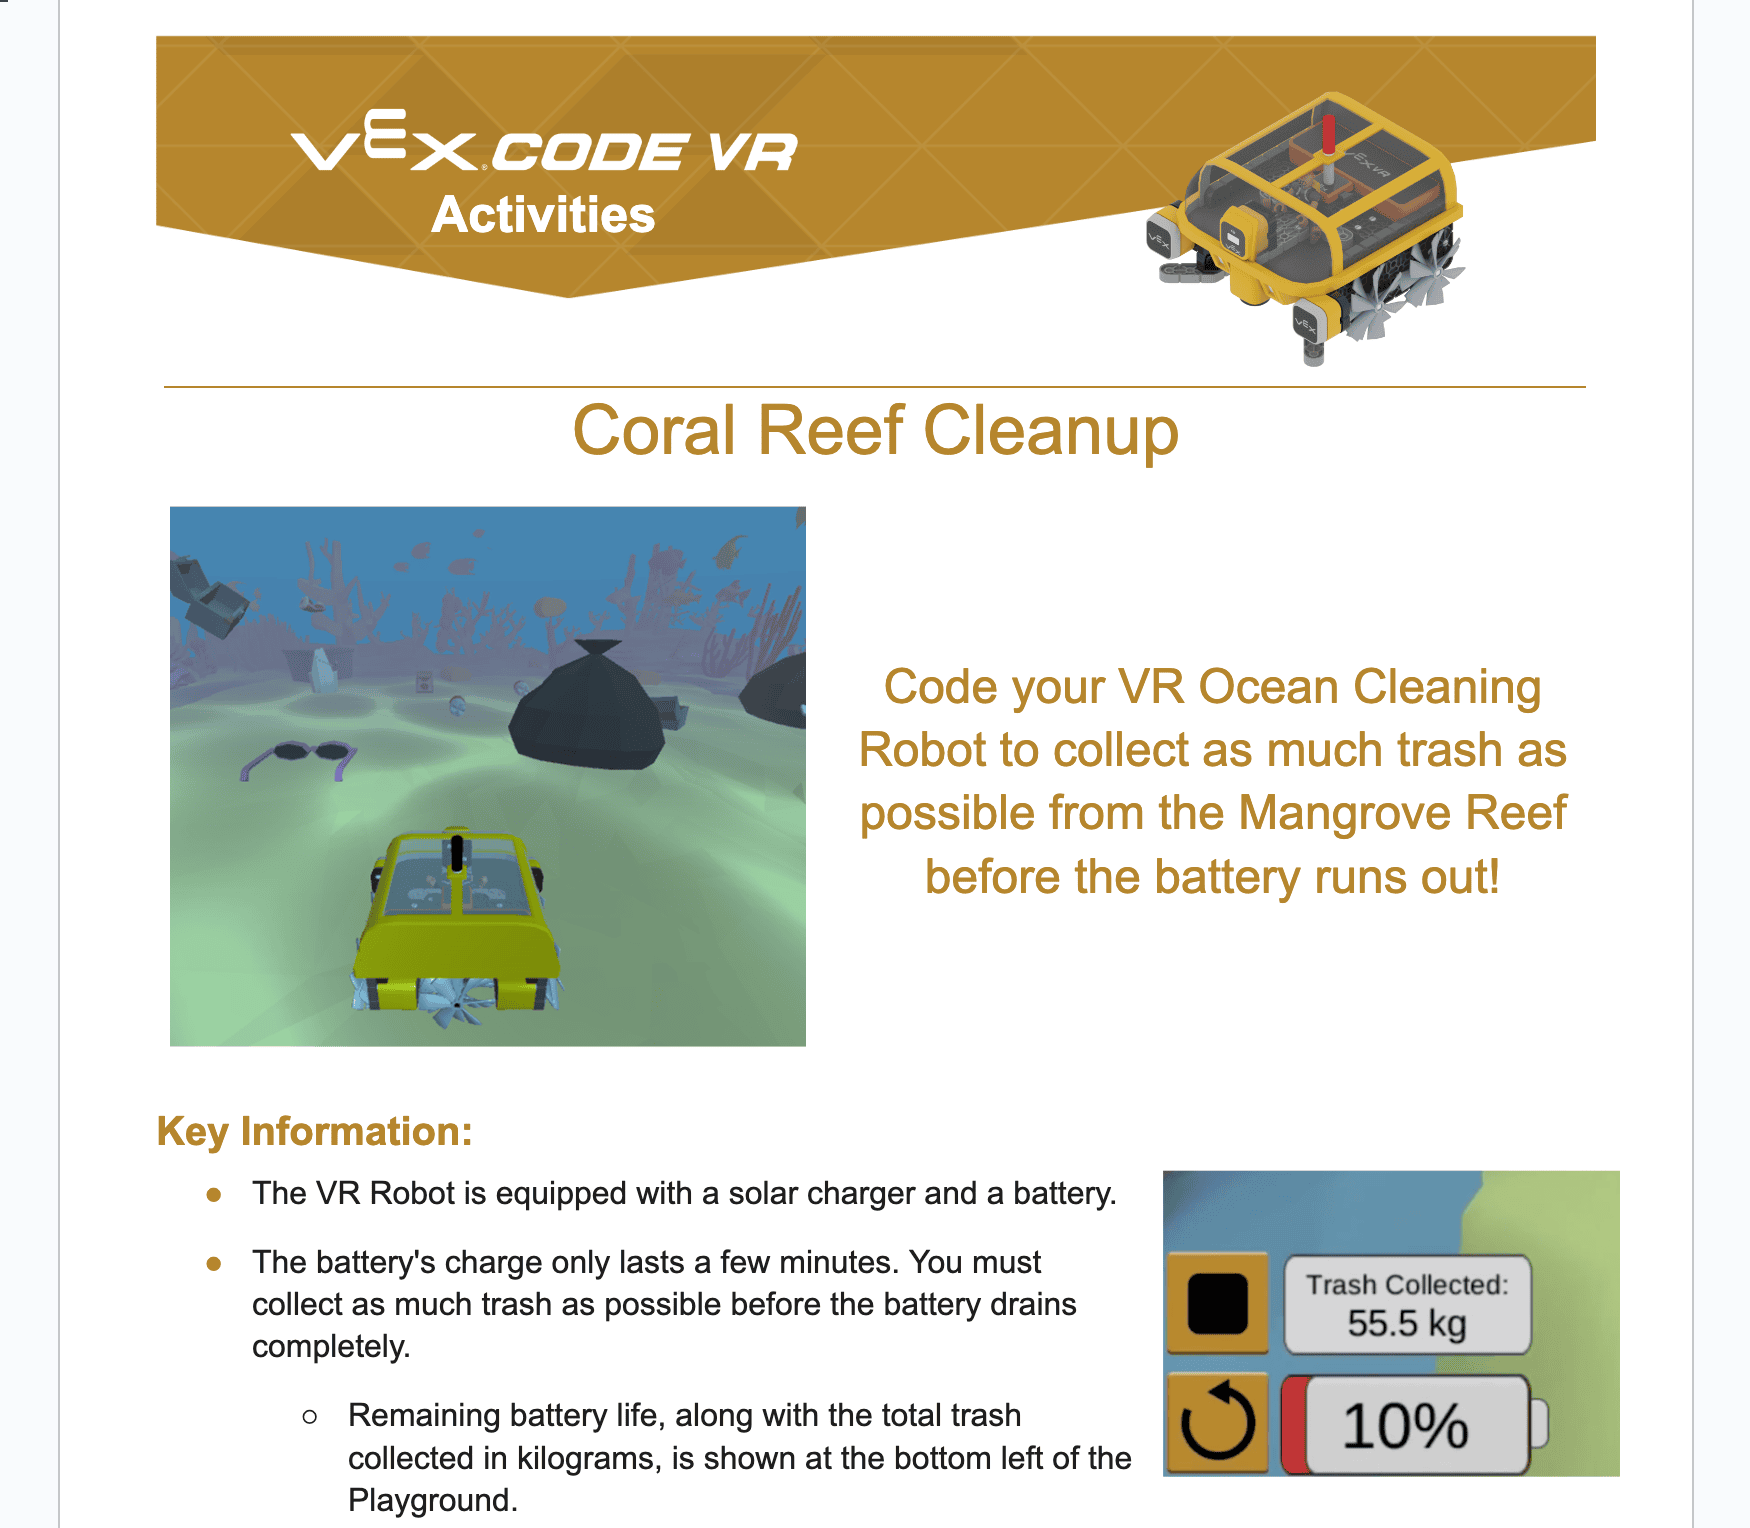
This Lesson will describe how to facilitate an open-ended challenge, such as the Coral Reef Cleanup Capstone Project, in your classroom.
Learning Outcomes
- Describe the resources available for students in an Open-Ended Challenge Unit.
- Identify the teacher’s role in facilitating an open-ended challenge.
- Describe the three phases of an open-ended challenge.
- Describe how to use the Challenge Rubric to assess students.
- Explain how to use check-ins and the final review to facilitate student learning.
Elements of an Open-Ended Challenge Unit
At the end of the CS Level 1 Blocks Course, students will apply everything they have learned throughout the course to complete an open-ended Capstone Project. Because of the nature of Open-Ended Challenge Units, student-facing content does not include direct instruction. Instead, it provides students with all the information needed to complete the challenge, allow you, the teacher, to act as facilitator throughout the challenge. The resources provided to students to help them complete an open-ended challenge are described below.
Challenge Video
Each challenge video follows the same format:
- Introduction to the challenge, including thematic framing and background information.
- Presentation of the specific problem and basic details needed to solve it.
- Outline of the process students should use to solve the challenge.
- Explanation of how students' progress will be assessed.
Challenge Details
This section of the page describes the challenge in more detail, including the goal of the challenge and the criteria and constraints of the challenge. Students are provided with a Challenge Document. This document provides "Key Information" and "Challenge Criteria" for the challenge and can be used to clarify logistical information for the challenge. A list of additional resources for solving the challenge is also provided in this section.
Challenge Rubric
Students will be evaluated on their progress and process using the Open-Ended Challenge Rubric. High-level information on each of the rubric’s categories is provided on the page, along with a link to the rubric. It is essential to ensure that students fully understand the criteria in each category.
Using the Assessment Rubric
Each team is evaluated on the following categories: planning and brainstorming, pseudocoding, coding and execution, teamwork and collaboration, and the success of their mission. Study the rubric before beginning the Unit.
Document students’ progress in an ongoing manner throughout the challenge. Carry a copy of the rubric for each team with you as you circulate throughout the room, observing their work. Make notes on students' teamwork and collaboration as you go.
Bring the rubrics to each team Check-in. This way, you can discuss student progress with them during the Check-in for that particular phase (e.g., planning and brainstorming during the Phase 1 Check-in) and make notes on the rubric. This will make it easier to evaluate all of the groups on each category, as opposed to trying to do it all during the Final Review. Making notes also gives you a jumping off point for discussion during both the Check-ins and the Final Review.
Final Review
During the Final Review, meet with student teams to review their progress throughout the challenge, and complete the rubric together.
- Allow students to share where they think their rating should fall on the rubric. Encourage them to back up their assertions with documentation from their engineering notebooks.
- Share your own rating, and the reasoning behind it, taking their assessment into consideration.
- Treat the rubric as a collaborative assessment effort between the students and yourself, so students see it as an opportunity for constructive feedback rather than something punitive.
- When used positively, the Final Review can be a tool for students to use to improve in future open-ended challenges in this Unit.
- Read this article to help keep the Final Review productive and positive: Having Effective Debrief Conversations with Students.
A Wrap Up Reflection with prompts is provided on the student page. Instruct students to complete the reflection either while waiting for their Final Review, or after the Final Review is completed.
- Once students answer the prompts individually in their engineering notebooks, they should be given time to meet once more as a team to discuss their answers.
Challenge Phases
Students are guided to solve the challenge using a three-phase process. During each phase, students will focus on a particular aspect of the problem-solving process, and are instructed to check-in with you for approval before moving on.
Phase 1: Planning
The first step to solving a challenge is understanding the challenge and making a plan. The goal of Phase 1 is for students to document and present possible solutions to solve the challenge.
What to look for during the Planning phase:
- Students spending time reviewing the Challenge Document, discussing the challenge criteria, and asking clarifying questions about the challenge itself.
- Active discussions and brainstorming between all members of the group around possible solutions. Groups should be talking to each other, actively sketching, writing, and/or gesturing to describe the movement of the robot, so that they can explain their ideas fully when they meet with you.
During the Phase 1 Check-in:
- Students present several thoughtful, detailed, collaborative ideas that explain how they will collect the trash.
- All students in the group understand the plans presented, and can offer pros/cons of each.
- Guide students to choosing one idea or plan to begin with. Be sure that you and the students are on the same page about how they are moving forward to Phase 2.
- Make notes on the rubric about the group’s planning and collaboration.
Phase 2: Pseudocoding
The next step is to break down the plan into the component steps. The goal of Phase 2 is for students to document and present detailed pseudocode showing the steps and behaviors needed to enact their plan to collect as much trash as possible from the coral reef.
What to look for during the Pseudocoding phase:
- Students discussing and coming to consensus on the high-level steps needed to complete the plan. They document these effectively.
- Students work on breaking down each step into the smallest possible behaviors needed to complete it.
- Note: The high-level steps of the plan should become the comments in students' projects in Phase 3. The individual behaviors within those steps correspond to the blocks to be used in the project.
- Pro-Tip: Encourage students to be hands-on, even though the challenge is in VEXcode VR. Print top down images of the Playground that students can draw on or use classroom materials to represent the robot and Playground elements, so students can better understand the sequence of behaviors needed to carry out their plan.
During the Phase 1 Check-in:
- Students share a logical, detailed sequence of steps that clearly communicates how the plan will be put into action with the VR Ocean Cleaning Robot.
- All students in the group understand how the pseudocode relates to the idea from Phase 1, and can answer follow up questions about it.
- Ask students about questions they have before they begin Phase 3. Do they know where to find resources to help them build and test their project effectively?
- Make notes on the rubric about the group’s pseudocoding and collaboration.
Phase 3: Building and Testing
The next step is to build and test a VEXcode project to solve the challenge. The goal of Phase 3 is for students to create a project that collects as much trash as possible, based on the plan and pseudocode they created previously.
What to look for during the Building and Testing phase:
- Students incrementally building and testing each step of their pseudocode in VEXcode VR.
- Groups revisiting their plans and pseudocode to refine it based on their experience.
- All students in the group actively participating in coding and problem-solving processes.
- Students documenting their iterations and testing in their engineering notebooks.
- Students iterating on their projects to actively improve how much trash is collected before the battery on the robot runs out.
Final Review
The Final Review serves as the Check-in for Phase 3. At this point, students should have a functional project that collects as much trash as possible from the coral reef.
During the Final Review:
- Observe the project in action and document the amount of trash collected when the project ends.
- Discuss how students built and tested the project together, and the role students played in that collaboration.
- Complete the rubric together with the students. Use the notes from Phase 1 and 2 to help recall planning and pseudocoding phases.
- All members of the group and the teacher should reach consensus about the rubric completion.
Making Check-ins Work For You
During an open-ended challenge, students will be in different phases of the challenge at different times, and will need Check-ins frequently. In order to keep Check-ins fruitful and to prevent frustration, set up a system for student Check-ins and share it with the class before beginning the Unit.
Have students sign up on the board to indicate that they are ready for a Check-in. You can then visit with groups in the order they are listed. Remind students that they should be refining their documentation and considering the rubric for each phase while they are waiting to meet with you. You can meet with students multiple times within one phase as well. They are instructed to Check-in with you before moving on, but students (or you) can request a Check-in at any point.
Following the Three Phases through an Example Task
To help understand how this three phase process functions to complete a challenge, let's look back at a task from earlier in the CS Level 1 Blocks course - Navigating through the first four Disks in the Disk Maze.
Phase 1: Planning
An Exemplary plan for this task could look like:
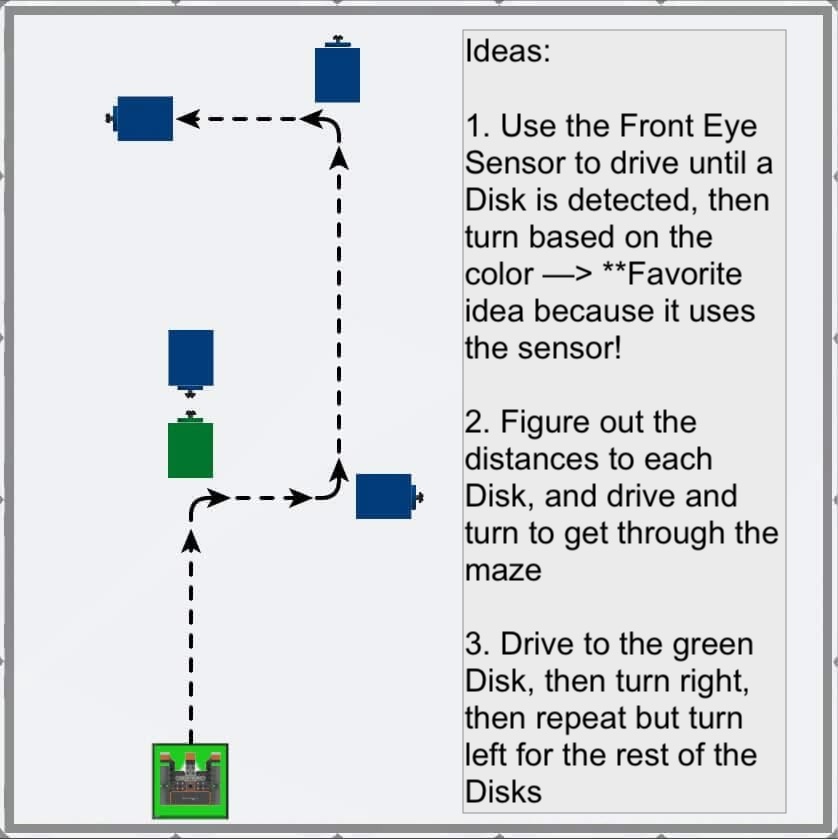
This engineering notebook example shows the path of the movement of the VR Robot, and has a written description of several ideas to complete the task. Student’s contributions are indicated in the documentation.
During the Check-in, as one student shared the engineering notebook, the second described the movement of the VR Robot to explain the ideas. Students described how they reached consensus on the favorite idea listed.
A Beginner plan for this task could look like:

This engineering notebook example shows one idea for completing the task, but it is minimally documented.
During the Check-in, only one student in the group participates in the conversation, and others cannot speak to how they contributed to the brainstorming process.
Phase 2: Pseudocoding
Exemplary pseudocoding for this task could look like:
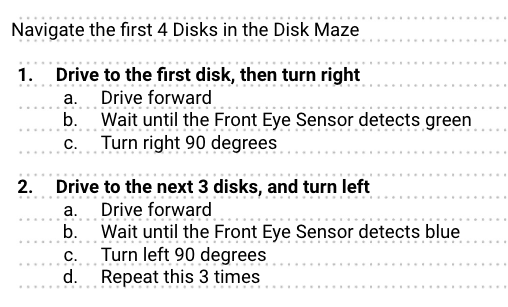
This engineering notebook sample shows the steps needed to complete the task. Each larger step is broken down into the smallest possible behaviors, which are sequenced effectively to communicate the plan.
During the Check-in, all students in the group were able to answer questions about the sequence of behaviors, and could talk about which blocks they thought they would need to code each step.
Beginner pseudocoding for this task could look like:
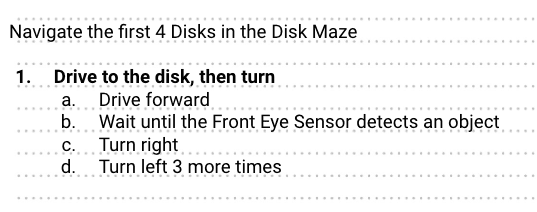
This engineering notebook example shows a partial description of the steps of the plan. The steps are not specific or the smallest possible behaviors needed to accomplish the task.
During the Check-in, the group could not describe what blocks or behaviors would be needed to complete the project.
Phase 3: Building and Testing
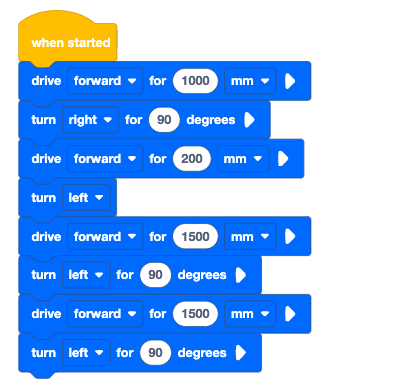
An Exemplary project for this task could look like:

This project uses the larger steps from the pseudocoding phase as the comments. The blocks are sequenced as needed to effectively complete the task and move the VR Robot through the first four Disks in the maze.
During the Check-in, the students run their project and move the VR Robot to the fourth Disk. One student explains how they used the Front Eye Sensor data in the project, while the second describes their role in using VEXcode, and how they used the Repeat loop effectively. Students share their strategies to complete the task collaboratively.
A Beginner project for this task could look like:
This project does not contain any comments. Blocks are sequenced so that a critical error occurs, and the VR Robot does not reach the fourth Disk.
During the Check-in, one student does all of the talking and complains about how the others were not helpful in solving the challenge.